Saturday, February 4, 2017

Red Bank Fall Y1 - Despair at Sightrock

Mission (Despair at Sightrock - Conquest Mission, Difficulty 4) : The Empire had begun pressuring the outer reaches of Red Bank, raiding different communities along the border. Resources were drained, resulting in a "Weapons are Stretched Thin" campaign aspect. Furthermore, Lily Manor's confidence in Red Bank eroded after they learned that Red Bank was interested in securing Thedda's Palimpsest from Burgan Vale.

Amidst this climate, the trio that tracked down the werewolf in the Spring headed out in the Fall to explore Sightrock. The advance force of farmers and crafters was succumbing to an intense depression and inability to work. Cyra suspected some manner of dweomer afflicting them.

Heroes taken on mission: Adula "Tracker of the Gray Wastes", Cyra "Alchemist of House Amber", Keel "Hobilar of the Amber Hand"

Adula was the spotlight character this time around. Her tracking and survival skills would be critical in mapping the region and discovering the sources of the discontent.

Build Developments: Built a broad number of developments: Trade Guilds, a Mana Forge, and an Arcane Bowyer.

Challenge Phase: The central feature of Sightrock is a large tower of stone visible from a great distance arround.

Challenge Scene: Secret Trails - Diff 2, 2 Suns, 1 Moon, Survival / Thievery : Adula and Keel paced the region in a deliberate fashion, looking for signs of activity. The Fall brought with it brutally cold winds. Dealing with the exposure took its toll on the duo, but they discovered suspicious patterns of tracks which entered and exited from around the North face of Sightrock.

Challenge Scene: On the Run - Diff 2, 2 Moons, Marksmanship : The blight on the land did not just affect humans, but animals as well. As the trio searched around the rock, looking for clues, they were set upon by a pack of foxes, swarming from many directions. This necessitated a controlled retreat toward the base of the rock, with Keel providing covering fire.

Challenge Scene: Avoiding Battle - Diff 3, 1 Sun, Disguise / Stealth : Pushed back towards the rock, the trio discovered an opening from which to hide from the beasts chasing them. Out of the frying pan into the fire! Within the passage, amidst dim torch light, Cyra found arcane runes hinting at the presence of old secrets long forgotten. Negotiating the passages required care and stealthy footwork - for whatever was here long ago laid many traps. As the group approached a deep space under the rock, Cyra became more concerned and fearful for what might lie below.

Advantage Scene: High Ground : Cyra moved into a wide open cavern with brackish water encircling a raised portion in the center. Her channeling allowed her to sense a presence in the water, a beast most foul and ancient. "Quickly, get to the high ground! Prepare your weapons!"

Conflict Phase (Skirmish): The Gray Spawn moved about the water quickly, looking for openings and attacking the weakest members of the group with hopelesseness and despair. Adula rushed forward, her powerful arms carrying a large sword toward the many slimy pseudopods whipping around in the dark. Keel rained down arrows at it, while Cyra cast down bolts of fire at any exposed areas.

Standing in front of the formless spawn of ancient magical energy took a tremendous toll on Adula. The creature focused a kind of cosmic blight upon her weak mortal consciousness. It was too much - Adula collapsed into the pool of muck, completely enervated. At the moment the beast was about to consumer her, Cyra managed to drain all of her magical reserves into one potent blast which roasted the thing. The magical backlash from casting such a powerful spell was almost more than Cyra could handle.

Mission Status: Success! Red Bank added Sightrock. Adula was completely full up on consequences, having been dropped by the formless spawn. It will take her quite a while to recover mentally from the brutal experience.

Stability: Stronghold: -1 (dropped one)

Ally Disposition: Burgan Vale +3, Crescent Hold +0, Gravewood -1, Lily Manor +2 (dropped one), Sunriders +2

Stronghold Developments:
Great Channeling
Great Casting
Mana Forge
Trade Guild
Arcane Bowyer

Regional Income:
Red Bank (Capital): 1 food, 2 timber, 2 mana
Echo Lake: 2 ore
Tarrydale Farms: 2 food
Green Vale: 1 food, 1 ore
Sightrock: 1 ore, 1 mana
---------------------------------------------------
Total: 4 food, 2 timber, 4 ore, 3 mana, 1 luxury

Schemes: None

Scheme Pool

These are special dice pools used for the solo version of WotA.

Diplomacy Pool: 1
Infiltration Pool: 1
Skirmish Pool: 1 (Schemes: 1)
Warfare Pool: 1

Region Threats: None

Faction Threats: Crescent Hold, Infiltration difficulty 6. The Empire is beginning a campaign of misinformation against Crescent Hold, subverting many of their core institutions. Given that relations with Crescent Hold are tenuous at best, this represens a disturbing development. Crescent Hold and Gravewood will probably not be reliable going forward.

Rules Musings:

The second skirmish playtest went much better than the first! The formless spawn had a mental attack that targeted a character's Will, which turned out to be really brutal considering none of the characters had high Will. May or may not be a problem - but it's always good to remember that creatures which target "secondary" sorts of defensive abilities may need to be scaled back a little bit.

Sunday, January 29, 2017

Red Bank Summer Y1 - Festival of Illusions

Mission (Festival of Illusions - Diplomacy Mission, Difficulty 4) : The Amber Hand raided Echo Lake, and the leadership of Red Bank chose to ignore the problem, letting the locals deal with it. This resulted in a loss of stability for Red Bank and a lack of goods coming from Echo Lake. Instead, Thea, Fuscus, and Viator headed out to Burgan Vale to find the location of Thedda's Palimpsest, the legendary book of arcane lore.

Part of this decision came from a desire to see diplomacy in action. But raising the disposition of Burgan Vale would be really nice as well.

Heroes taken on mission: Thea "Speaker for the East", Fuscus "Master of Coin", Viator "Courtier of Candlelight Keep"

The spotlight character was Fuscus. Fuscus had a connection within Burgan Vale: Childric, the washed up mercenary captain. Both Childric and Fuscus were from Southkeep. This would be a recurring theme for the mission.

Build Developments: Lacking the resources from Echo Lake made things difficult, but still managed to obtain Great Casting, thus unlocking the possibility for a Mana Forge in the fall.

Challenge Phase: Preparations for the Festival of Illusions, the annual celebration of magic in Burgan Vale, were underway. Thea took the opportunity to make contacts and meet up with old friends, while Fuscus and Viator undertook efforts to find information that could be used as leverage by Red Bank.

Challenge Scene: An Unseemly Past - Diff 5, 2 Suns, 1 Moon, Disguise / Thievery / Stealth : Fuscus and Childric did all sorts of morally questionable things on the streets of Southkeep when they were growing up. For insurance, Fuscus and Viator decided to dig some of this up on Childric. Playing innocent, asking around, and using some measure of deception let them find out that Childric didn't come to Burgan Vale under the most honest of circumstances. His past as an enforcer for the Empire was not something he wanted to get out. Should the situation arise, such information could prove useful.

Advantage Scene: Alda's Hopes and Dreams : While Fuscus and Viator were busy, Thea spent time with Alda, the horsemaster for Burgan Vale. She took the time to better understand and relate to Elisa's granddaughter on a more personal level. This culminated in the creation of a mission aspect with two free invokes.

Challenge Scene: Structural Weakness - Diff 3, 1 Moon, Engineering / Wits : In the tower of Arankh, Thea and Fuscus met with Marellus to go over security within Burgan Vale. Leveraging information from Fuscus' past, the duo exposed some weaknesses that the Autarch may be able to exploit. Marellus was grateful for their aid.

Challenge Scene: Bending Elisa's Ear - Diff 1, 1 Sun, 2 Moons, Society: After an initial difficult challenge, the rest of the scenes proved fairly easy. The final challenge scene showcased Thea following Elisa about while Elisa performed various preparation tasks for the festival. Thea took the opportunity to get closer to Elisa.

Advantage Scene: Favor of the Blue Robes: Finally, Fuscus and Viator worked to gain the favor of the Order of the Eye. With Viator's magical knowledge and Fuscus' charm, they were able to create a campaign aspect with two free invokes.

Diplomacy
Conflict Phase (Diplomacy): The three envoys from Amber Hand worked carefully and methodically in addressing and discussing issues that came up for Burgan Vale. Marellus hammered on the history of Red Bank, the questionable relationship with the Amber Hand, and whether or not Red Hand could really be trusted with the knowledge of the Palimpsest. Elisa completely charmed Thea, using magic to put her in Burgan Vale's pocket for quite some time to come. Thea ended the conflict with both a moderate and a severe consequence reflecting this attraction to Elisa! In the end, the heroes narrowly completed three issues.

Mission Status: Success! Disposition with Burgan Vale increased by one. However, Red Bank had two campaign consequences with one free invoke each, Questionable Past and Watched by Elisa.

Stability: Stronghold: -1 (The raiders of the Amber Hand took their toll.)

Ally Disposition: Burgan Vale +3, Crescent Hold +0, Gravewood -1, Lily Manor +3, Sunriders +2

Stronghold Developments:
Great Channeling
Great Casting

Regional Income:
Red Bank (Capital): 1 food, 2 timber, 2 mana
Echo Lake: 2 ore
Tarrydale Farms: 2 food
Green Vale: 1 food, 1 ore
---------------------------------------------------
Total: 4 food, 3 timber, 4 ore, 2 mana, 1 luxury

Schemes: Skirmish One! The Autarch was causing problems on the frontier. Ignoring the scheme would mean a campaign aspect for the Autarch.

Scheme Pool

These are special dice pools used for the solo version of WotA.

Diplomacy Schemes: 1
Infiltration Schemes: 1
Skirmish Schemes: 1
Warfare Schemes: 1

Region Threats: None

Faction Threats: Lily Manor, Diplomacy difficulty 6. Lily Manor is nervous about the push toward gaining the Palimpsest. This worry could fester.

Rules Musings:

Used the same basic structure for diplomacy as was used for skirmish: each opponent has a chart which determines their action and the resulting total. It worked pretty well! It was difficult, probably on the border of being too difficult, but I enjoyed the fact it was kind of in doubt. It would be pretty fiddly if played solo, though. It's not as bad with a group if each player controls one of the opposing leaders as well. That kind of reduces the amount of info that's needed to track.

Also, it would be nice if the charts didn't need the character skill numbers at all. Currently, they do. That will make things a little redundant, but it's another way to be less fiddly. Used the complication and invoke rules tweaks from last session, and that went much better!

All in all, it worked fairly well. The biggest issue is probably going to be in terms of developing the info so that it's easy to track.

Next Session:

Not sure! Given how tough a difficulty 4 diplomacy mission was, the difficulty 6 mission to Lily Manor probably isn't going to happen. So that disposition is going to drop. And it doesn't really seem worth it to try to stop the Autarch's skirmish plans. Early on, they aren't that bad.

Most likely it will be an exploration mission to either Sunset Isles (diff 4) or the Gray Forest (diff 5). It would be good to ping-pong a few times between skirmish and diplomacy for playtest purposes, before moving on to infiltration and warfare. Probably choose Sunset Isles as Gray Forest looks pretty tough.

Sunday, January 15, 2017

Red Bank Spring Y1 - Werewolf of Hambridge Farms

Mission (The Werewolf of Hambridge Farms - Conquest Mission, Difficulty 4): For the first mission in the co-operative campaign I chose to help Green Vale with their werewolf problem. One of the easiest openings in WotA is to go after North Oaks, since the difficulty is only 3. But the food located in Green Vale makes it more attractive. I created some initial playtest rules to handle complications and invokes without an Autarch player, as well as rules to handle how the werewolf would move and attack.

Heroes taken on mission: Adula "Tracker of the Gray Wastes", Cyra "Alchemist of House Amber", Keel "Hobilar of the Amber Hand"

Although it's possible to play with only two characters, it's fairly difficult, so for this playtest Jennifer took on the roles of Cyra and Adula, while I played Keel. The spotlight player was Adula. This mission revolved around the young Cyra's growing realization that the world was much broader than her rather narrow form of schooling would lead to believe her. Adula was selected as the spotlight character since she knew more about the smaller farms and establishments surrounding Red Bank.

We talked for a while about how Red Bank is perceived in the world. There's a rift between the smaller hamlets and farms and the large technological hub within the capital. Cyra has been insulated inside this academic hub, studying magic and science and new forms of government. Keel comes from a time before this rapid progress. Keel is the classic veteran of many wars, coming as he did from the brutality of the Amber Hand. The tension between them was a big part of the mission. Somewhere in the center was the practical Adula, balancing both of their personalities with the need to finish the job at hand.

Build Developments: Rough rolling to start the campaign! But Red Haven finished work on Great Channeling. Which could come in handy given the number of spellcasters in Red Bank. Hopefully a Mana Forge is possible to build in the not too distant future.

Challenge Phase: The heroes made it to Hambridge Farms, the large agricultural center within the Green Vale. Hambridge Farms is run by Mila. The people of the farms have made token sacrifices to the werewolf as a way to appease it from making even worse attacks.

Challenge Scene: Over Hill and Under Hill - Diff 2, 2 Suns, 3 Moons, Survival / Thievery: Adula and Keel were in the first scene together. The card draw triggered a complication (suns higher than moons), which netted Adula another fate point, but made the scene more difficult by adding moons. As an initial way to handle complications in Autotarch, they occur whenever the suns are higher than moons. Adula charged ahead through cliffs and underbrush, ignoring demands for sleep and rest. The hunt took its toll on Adula and Keel. But they narrowed down how the werewolf moved about the farms.

Advantage Scene: Wolfsbane: Cyra took the opportunity to research Wolfsbane while Keel and Adula were out and about. She was successful, creating the Wolfsbane Oil mission aspect.

Challenge Scene: Animal Movement Patterns - Diff 1, 3 Suns, Survival / Thievery: With some research, Cyra ended up using the history of animal movement patterns to find holes in where they were located. Rather than wait for Adula and Keel, she charged off into the woods on her own to confirm her hypothesis. What she learned is that the woods are unforgiving, gaining the "Rocks Are Not Beds" consequence from gaining too much stress.

Challenge Scene: Amber Hand Raiders - Diff 7, 1 Sun, 2 Moons, Fighting / Marksmanship: Adula and Keel had drifted rather far away from Green Vale when Keel heard a familiar sound - the whistle of an attacking Amber Hand raiding party. The Amber Hand had never forgiven Keel for defecting and throwing his support in with Red Bank. Red Bank founders had used the Hand to secure territory and alliance, but then cut ties with them. Keel struggled with his feelings toward the Hand, but ultimately decided that they were not the path toward a brighter future. Many in the Amber Hand took this move as a betrayal, and Keel was now a wanted man.

The attackers were young, which gave Adula and Keel an advantage. Keel reacted quickly, dropping a sniper hidden in the trees and given Adula time to react. Adula bull rushed in - smashing one of the attackers and summarily dispatching another. The final few ran off. This would come back to bite the heros when threats were determined.

Advantage Scene: Angry Townsfolk: Jennifer decided to make a tactical choice by using a hindering aspect on one of Cyra's skills while she was creating advantage. This would almost certainly result in failure (and it did), but it gave Cyra two advances in Command. Coupled with the free one at the end of missions, this would be enough to raise Cyra's Command skill up.

Cyra decided to dismiss the folk wisdom of the local townsfolk in making her plans to deal with the werewolf. It was a city slicker vs. country bumpkin moment. In this case, the country bumpkins were onto something. Cyra decided to mess with the offerings to the werewolf, deciding they were of no benefit. Instead, this enraged the werewolf, causing it to attack in town. The Autotarch got the Endangered Farmers mission aspect with two free invokes. The farmers were going to be in the way during the final battle!

Conflict Phase (Skirmish): The werewolf could sense Cyra's weakness and stalked her relentlessly. Keel and Adula did a good job taking advantage of its aggressiveness, picking out openings and making it pay. Cyra also nailed it with a fairly potent fireball.

However, the werewolf took a pound of flash, pinning Cyra up against a wall and slashing her up. It was only the last second heroics of Adula that saved her. But Cyra still ended the mission with multiple consequences, both physical and stemming from her shaken confidence.

Mission Status: Success! Red Bank added Green Vale.

Stability: Stronghold: +0

Ally Disposition: Burgan Vale +2, Crescent Hold +0, Gravewood -1, Lily Manor +3, Sunriders +2

Stronghold Developments:
Great Channeling

Regional Income:
Red Bank (Capital): 1 food, 2 timber, 2 mana
Echo Lake: 2 ore
Tarrydale Farms: 2 food
Green Vale: 1 food, 1 ore
---------------------------------------------------
Total: 4 food, 3 timber, 4 ore, 2 mana, 1 luxury

Schemes: None

Scheme Pool

These are special dice pools used for the solo version of WotA.

Diplomacy Schemes: 1
Infiltration Schemes: 1
Skirmish Schemes: 1
Warfare Schemes: 1

Region Threats: Echo Lake regional threat, Skirmish difficulty 5. Attack of the Amber Hand raiders! We decided this threat would be the Amber Hand raiders coming back for more. Maybe they'll be recurring villains in this campaign?

Faction Threats: None

Rules Musings: Lots of stuff.

The Werewolf:

Overall, I think this session went pretty well. The werewolf was actually pretty fun. I created a chart to handle its behavior. The symbols on the Deck of Fate cards were used to determine the action type, while the value was its result (usually its result on the fighting check, possibly with a bonus based on the chart).

Kind of like:

...
Eclipse - Lycanthropy, move 4 and infect with lycanthropy (this was a special effect that basically gave the hero a really long term consequence)
3 Moons - Whirlwind Attack, move 5 toward zone with most characters, attack all with Fighting +2
2 Moons - Heightened Senses, move 5 toward character with lowest Athletics, attack with Fighting +1
1 Moon - Quick Attack, move 4 toward character with most physical stress, attack with Fighting
1 Sun - Powerful Attack, move 1 toward character with most physical stress, attack with Fighting +2
...

That sort of thing. If there were multiple symbols on a card (like 2 moons and 1 sun), the werewolf would do both, starting with the moons action. I have different "archetypes" for enemies, like tank, sneak, striker, that sort of thing. This fight went well. In fact, movement played a bigger role in this fight because the werewolf AI doesn't always do the optimal thing, which actually can make positioning matter a little more. It isn't easy to craft those charts, though, there's quite a bit of possibility to have really weird or boring interactions.

This kind of approach might be trickier with lots of minions. It might be one card draw determines the behavior of all of them at once. Drawing one card for every minion sounds like a pain.

Defense or Offense:

I kind of like the idea that the Autotarch never makes checks (the AI doesn't draw cards). So, on defense the werewolf will just have a target number. Drawing one card for the attack and one for defense is kind of a pain. With multiple players, drawing a card makes you feel like you have some agency. With one player, it's just extra fiddliness. And really, with the fate distribution, the only thing really happening is a pushing out of that bell curve. It makes it so that results like +6 or +7 are possible, since both cards are added.

Jenn didn't like the idea of drawing a card for the hero's defense, though. Since the werewolf wouldn't draw one for defense. I think it might be useful, though, because a card draw is a signifier to invoke aspects, etc. I don't think it's a big deal either way, but it could be when there are multiple opponents.

Invokes:

The Autotarch fate point spends didn't really work, though. I had this "trigger" thing where the Autotarch spends fate points in certain conditions. But the sequencing was hard to remember and untangle. I was hoping the AI wouldn't have to do invokes at all, but there's just too much in WotA that needs that ability. And one of my design goals is to keep as much the same on the player side as possible. I don't want to change how skills, stunts, core actions, developments, etc, work if I can help it.

So I'll have to do something a little more "dumb" but easy to remember. Like enemies invoke one aspect on their action during the conflict any time one is available, regardless. At least then they'll all get used, and it will be much easier to untangle and remember. Granted, there's always the chance an opponent does it at a really weird time that doesn't make sense. But the tables are much harder than the human controlled opponents, so that's how I'll balance it, I think.

Complications:

I also created an easy way to handle complications (any time the suns are higher than a moon when creating a scene). That worked well, I think, but there's some sequencing weirdness. A player creates a scene, draws a card, then when do players commit vs. when is there a complication? I think it works a little better if other heroes commit to the scene before the complication is determined. That makes it harder for the players, but I think it's a little bit better of a narrative flow. Again, not a big deal, but these are the sorts of rough edges that Autarch players usually handle which I didn't think about with Autotarch rules.

Friday, January 13, 2017

Red Bank Stronghold Creation

I'm currently working on developing Autotarch: solo and co-operative rules for Wrath of the Autarch. As part of that design process, I'm going to run through a new campaign! My hope is that I'll be able to design the rules iteratively, adding and tweaking rules before each session.

I created a broad stable of characters for this campaign, rather than adopting a more focused strategy. I'd like to see many different types of missions play out, so breadth was more important than depth. I have a rough idea for a Stronghold and a starting set of characters. I like starting a little sketchy, and filling out ideas as the campaign goes along.

Along with the narrative details of the unfolding campaign, I'm also going to use this forum to go into some detail about various mechanical options that I'm weighing. I'll put that information at the end of the different session posts.

Red Bank

I like the idea of creating a strong trading capital, something to rival Lily Manor. It is fairly cosmopolitan. There's a little double entendre in the name. Red Bank is both a monetary hub as well as being situated on a wide, winding river.

Wrath: Interest is Owed

There's a dark history buried in Red Bank's past. The founders of Red Bank borrowed significant funds and resources from the current Autarch's grandfather to start this new colony. Contracts were signed and agreed upon to pay these funds back. Due to a growing cultural rift, there is no political will to make these payments. So they have stopped. The Empire will not abide by that decision.

Belief: Keepers of True Lore

The people of Red Bank feel like they hold keys to knowledge which would be lost under Imperial rule. Large libraries adorn the city proper. Protecting this hard gained knowledge is a common rallying cry within Red Bank.

Culture: Duality of Atom and Void

There are many sects within Red Bank that value empirical inquiry. This inquiry has been codified and adopted into cultural norms that ripple outward: a rejection of determinism and the adoption of scholarly hedonism. This puts Red Bank closer ideologically to Lily Manor than the Empire.

History: Riders of the Amber Hand

All was not always scholarship and republicanism. Prior to founding Red Bank, most of the inhabitants in the area were members of a vicious warband known as the Amber Hand. There is still an affinity toward the legacy of mounted warfare handed down from those founders. This is also part of the dark past of Red Bank: it is a city founded on violence and theft.

Rule: Elevenfold Conclave

Different subject matter experts are elected throughout the populace to serve on a broad council which makes most of the policy decisions. The process of election varies, and is frequently plagued by corruption and graft, but many of the leaders are competent and have thus far guided Red Bank to rapid success.

Faction Dispositions

Note: rather than have two factions starting with disposition, I'm going to have one of them start at -1. This will make things a little harder, but that's going to be necessary in general in the co-op version.

Lily Manor: 3
Burgan Vale: 2
Sunriders: 1
Crescent Hold: 0
Gravewood: -1

Heroes

For now, I'm just coming up with a core concept and the top few skills. The rest will get fleshed out over the course of the campaign. There is quite a bit of magic in this set of characters, so getting mana will be useful.

Adula - Tracker of the Gray Wastes (Fighting, Engineering)
Viator - Courtier of Candlelight Keep (Secrets of the Mind, Lore, Thievery)
Cyra - Alchemist of House Amber (Secrets of the Elements, Lore, Tactics)
Arilde - Hawkleader of the Ghost Legion (Command, Fighting)
Yasmina - Keeper of Natural Lore (Secrets of the Wild, Lore, Stealth)
Keel - Hobilar of the Amber Hand (Marksmanship, Stealth)
Thea - Speaker for the East (Society, Command)
Oniri - The Last Necromancer (Secrets of the Dead, Lore, Command)
Fuscus - Master of Coin (Rapport, Disguise)
Lucia - Youngest Daughter of the Guild of Secrets (Thievery, Rapport)

Tuesday, October 6, 2015

WotA Tutorial 3: Campaign Aspects and Reincorporation

Now that the Wrath of the Autarch kickstarter is in full swing, I thought I would discuss some other aspects (heh) of the kingdom building game that might be of interest to Fate Core players. In particular, how Wrath of the Autarch handles aspects that have impact at different timescales.

If you haven't heard of Wrath of the Autarch, check out the kickstarter here: https://www.kickstarter.com/projects/295104591/wrath-of-the-autarch-a-kingdom-building-game

Aspects at Different Timescales

A Sunrider Visits Her Clan's Ovoo
Wrath of the Autarch has aspects which occur at three distinct timescales: minor advantages, mission aspects, and campaign aspects. As well as having varying timescales, the longer lived aspects typically have a more central role in the campaign.

  • Minor Advantages - These are very short lived transient aspects, similar to boosts. They can be created as an action during either the challenge phase or the final conflict. Usually, minor advantages are not written down. Furthermore, they don't last beyond the end of the creating player's next turn.
    • FlankedEmbarrassed, Hidden
  • Mission Aspect - Mission aspects are created during the challenge phase as an action. They last until the end of the current mission (the end of the season). As such, they tend to be harder to create. Mission aspects are usually created during the challenge phase for use during the conflict.
    • Wolfsbane, Heinrich's Password Convention, Curio for the Prince
  • Campaign Aspect - Campaign aspects are created during the challenge phase as an action. They're written down on the Stronghold sheet and last the entire campaign (or until they're no longer applicable).
    • Sword of Kynian, Contact within Autarch's Spy Network, Angry Hearts in Burgan Vale

Create Advantage as Scene Creation

Creating mission and campaign aspects is a bigger deal than creating minor advantages. These aspects can't be created during a conflict and can't be created if a character is in a challenge scene. Instead, the creation of these sorts of aspects is handled as their own scene. The Stronghold player who wishes to create the aspect sets the scene on their turn, then uses the appropriate skill to see if they're successful.

The opposition for creating mission aspects is equal to the difficulty of the mission. The opposition for creating campaign aspects is two higher than the mission.

Example: Rebecca is playing Varys, the silver tongued sorcerer from Aben's Hollow. He is deep within the Imperial library at Northkeep, looking for a particular book of Secrets. "Varys is trying to find the Whispers of Kynian, famed for revealing the secrets of the mind. I'd like to create a campaign aspect."

The mission difficulty is 4, so the opposition to create a campaign aspect is 6. Varys is using his Lore skill, which is 5. Rebecca gets a +2 on the check, success! She writes down the aspect Whispers of Kynian on the Stronghold sheet with one free invoke.

Reincorporating Campaign Aspects

By virtue of writing these aspects down on the Stronghold sheet, they become reincorporated over the course of the campaign. This is a particularly nice feature for Wrath of the Autarch given that there is no gamemaster. Typically, reincorporation of thematic content is one of those elements that gets forgotten without one strong driving force. By writing campaign aspects down they become important and explicit.

The Autarch player also sometimes is able to create campaign aspects to reflect negative situations - such as Angry Hearts in Burgan Vale. During a related mission, the Stronghold players could attempt to deal with this as an overcome action.

Friday, February 20, 2015

WotA Tutorial 2: Challenge Scenes

Challenge Scenes

During the challenge phase, the players work together to craft challenge scenes that drive towards a climactic conflict (the conflict is the final part of the mission). The Autarch player may add additional complications to challenge scenes - making them more difficult to resolve. The players need to complete one challenge per Stronghold player, and they only have three exchanges to do it! Failing to do so in the given time gives the Autarch player additional fate points for the conflict. The challenge phase is also an opportunity for the Stronghold players to make longer term plans in the form of campaign aspects.

The Stronghold players each take one of two actions during the challenge phase: resolving a challenge scene (Overcome) or creating aspects (Create Advantage). Wrath of the Autarch uses three types of aspects: minor advantage, mission, and campaign. The challenge phase is the only time mission and campaign aspects may be created. Creating mission and campaign aspects may only be done when heroes aren't in challenge scenes (creating mission and campaign aspects involve short scenes of their own).

Conquering North Oaks

For this example, Steingrimr the Noble Barbarian, Aine the Headstrong Ranger, and Arild the Hollow Eyed Assassin are attempting to wrest the neutral region North Oaks from the necromancer Malthias. This is a Conquest (Skirmish) mission with a difficulty of 3 - fairly easy as these things go. Let's go through one exchange of action! Each Stronghold player takes a turn in any order they wish.

Creating a Scene

If a hero isn't already in a challenge scene, they may create a new scene as part of their action. Aaron, playing Steingrimr, decides to create a scene. A fate card is drawn and used to create the scene.

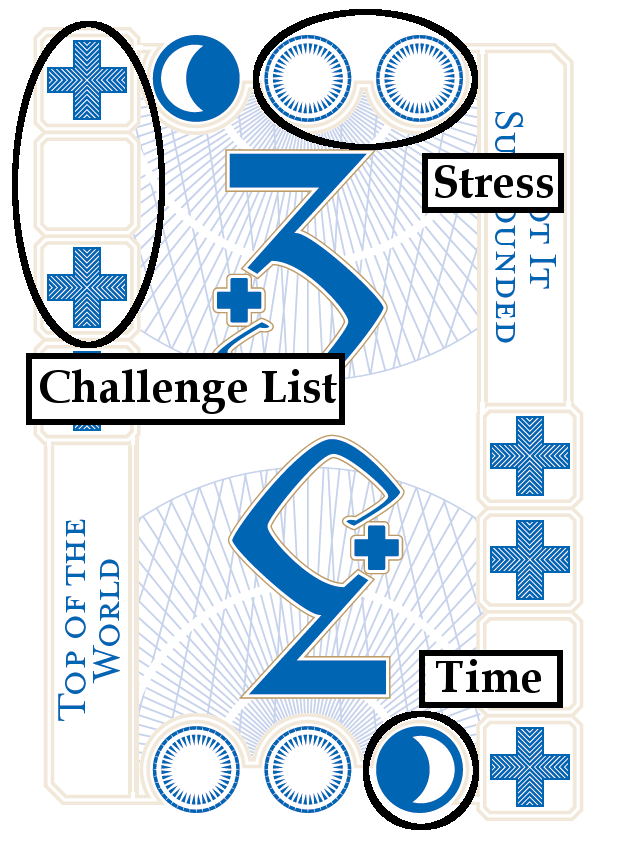
Creating a Challenge Scene

A challenge scene is composed of:
  • A difficulty (the result of the card plus the mission difficulty)
  • Allowable skills for resolving the scene (found by looking at the appropriate Challenge list)
  • (Sometimes) Stress taken when resolving the scene (suns)
  • (Sometimes) Additional time needed to resolve the scene (moons)
  • Heroes in the scene

Challenge Scene Details
The first three dice on the card are used to determine which entry from the Skirmish Challenges list to use. Looking at the Skirmish Challenges list, the result for this card is the On the Run, which must be resolved using Fighting and Survival. The phrase On the Run is used to help inspire a theme for the challenge scene. In addition, the moons (additional time) and suns (stress) help inspire the narrative of the scene. Scenes flow together, taking into account the mission, campaign aspects, and other influences to help craft an interesting narrative.

The difficulty of this scene is 6 (mission difficulty of 3 plus 3 more for the result on the card) - not very easy! The two suns and one moon indicate it's both stressful and time consuming. Aaron decides that the scene involves a bone golem Malthias' has constructed chasing the heroes through the dense woods. The giant beast is chasing them from their encampment, attacking with a massive club, bashing tree limbs and hero limbs along the way. The heroes are attempting a controlled withdrawal, trying to escape the beast.

Since Aaron drew the card, Steingrimr must be in the scene. The other characters may be in the scene at their option. Heroes in a challenge scene may not create mission or campaign aspects (only minor advantage may be created while in a challenge scene), so occasionally it's worth not joining in a scene. However, this is an all hands on deck situation, so both Aine and Arild are with Steingrimr!

Steingrimr Attacks (Resolve Challenge)

It's Aaron's turn (he drew the card). He may either create an advantage or try to resolve the challenge. The moons must be removed before the challenge may be successfully completed. The opposition for this task is equal to the number of moons (one). Usually this is easier, but it makes the scene take longer.

Steingrimr is a warrior, with a Fighting of +4. Aaron decides to try to remove one of the moons using the Resolve Challenge (Overcome) action rather than creating an advantage. He gets a -2 - for a total of +2, success!

Additionally, every time the resolve challenge action is taken, the hero takes all of the suns on the card as physical or mental stress (up to the player). Steingrimr waits behind a tree, lunging out and smashing the beast! It hits him back, Aaron marks the second box on Steingrimr's physical stress (from the two suns). This buys the group more time to retreat, but the beast takes its toll!

Aine Provides Cover Fire (Create Advantage)

Aine's player, Shawn, decides to lay down defensive fire to buy time for Arild to find shelter from the beast. This takes the form of a Create Advantage action. Only minor advantages may be created while in a challenge scene. Furthermore, only other characters in the same scene may utilize these minor advantages. The difficulty to create a minor advantage is two less than the mission difficulty (in this example a mere +1, since the mission difficulty is 3).

Shawn decides to use Marksmanship to create an advantage. Any appropriate skill may be used for the creation of advantages. Skills used for resolving a challenge are restricted to those on the challenge list (in this case Fighting and Survival). Aine's Marksmanship is +4, and Shawn gets a result of +1 for a total of +5. Success with style!

Shawn creates the aspect Covering Fire, giving it two free invokes from success with style.

Arild Finds Shelter (Resolve Challenge)

Finally, Arild must take an action. With the two free invokes, Geoff, Arild's player, decides that Survival might be a good way to find a path out of these woods and away from the bone golem. The difficulty is +6 to resolve the challenge scene. Not so easy, but armed with the free invokes from covering fire, Arild has a much better chance of success.

Arild's Survival is +3. Geoff initially gets a -3, ouch! Using one of the free invokes, Geoff re-draws, getting a +2, much better! The total is now +5. Using the other free invoke to add +2 to the result, the result is +7, success! However, Arild must take two stress from the two suns on the challenge scene from using the Resolve Challenge action. Geoff marks off the second box on Arild's mental stress track.

Also, because the difficulty of the opposition was higher than Arild's Survival skill, Geoff may mark off one skill advance box for Survival. When a character has three skill advances they may improve their skill rank. Skills only advance this way during the challenge scene, not during the conflict.

While Aine keeps the beast at bay, Arild studies the landscape carefully. His trained eyes spot a narrow cave entrance on the side of a hill. The heroes rush towards it, escaping the beast! Geoff marks off Arild's second mental stress box (from the two suns) - the close call impacted Arild's nerves!

Friday, January 16, 2015

WotA Tutorial 1: Trading for Fun and Profit

This is the first in a series of posts designed to highlight the kingdom building game Wrath of the Autarch through examples of play. For a general overview of Wrath of the Autarch, see here: http://grue-fodder.blogspot.com/2014/06/what-is-wrath-of-autarch.html

The beta rules can be found here: https://sites.google.com/site/frontiergamedesign505

Stronghold Upkeep

The first part of every session is dedicated to Stronghold Upkeep: applying ignored threats, gathering resources, trading with other factions, feeding the population, and building developments. Developments are sort of like stunts for the Stronghold. They may improve the Stronghold's ability to wage war or they might grant access to better resources for all of the heroes associated with the Stronghold. This tutorial focuses on the process of getting resources and using them to build developments.

Hope Springs Eternal

It is the Spring of Year 3. The Stronghold of Aben's Hollow plans an Alliance mission to visit the Gravewood, their ally, beseeching them for aid in the coming battle with the Empire. Luckily, there were no threats at the end of last season, so all their regions are available to them. Aben's Hollow controls the following regions:
  • Obsidian Wood - 1 food, 2 timber, 2 mana
  • Echo Lake - 2 ore, 1 luxury
  • Tarrydale Farms - 2 food
  • Green Vale - 1 food, 1 ore
  • North Oaks - 1 timber
  • Totals: 4 food, 3 timber, 3 ore, 2 mana, 1 luxury


A Fickle Harvest

The first step is to gather six sided dice for each available resource. It's easiest to use different colors of dice for each type of resource.
Gather resource dice: 4 Food, 3 Timber, 3 Ore, 2 Mana, 1 Luxury

After all the dice are gathered, they are rolled by the spotlight player to determine the specific amounts of each resource available. Rolling the dice represents all the fickle supply issues that can impact seasonal harvest and usage. Each session a different spotlight player is featured. (The spotlight player has additional importance besides managing resources for the session.)
Roll dice: Food: 5,3,3,2 Timber: 4,2,1 Ore: 2,2,2 Mana: 5,3 Luxury: 3

Tactical or Strategic Development Building

Each development has resources requirements and possibly other developments that must be built first. When building a development whole dice must be assigned to reach the resource total. The values on the rolled dice may not be split up.

It's best to look at what developments are desired, and then decide whether to get the one that is really desired (thinking strategically) or try to optimize the rolled dice to get as much as possible (thinking tactically).

For the current mission Aben's Hollow is on (Alliance), either Trade Relationships or Arts and Entertainment would be nice. They could also prove useful in the future as well. Another really nice development that Aben's Hollow wants is the Mana Forge given they have lots of spellcasters associated with the Stronghold.
Aben's Hollow doesn't have enough luxuries to get either of these
Unfortunately, Aben's Hollow only has 3 luxuries total, which is too low for either of these. They also only have 7 timber, which is too low for Arts and Entertainment.
Aben's Hollow could pick this one up
Mana Forge is available and useful. Most likely they could get this and something else.

Wheeling and Dealing

What to do if you want more resources? Trade! There are five minor factions in the game, and they each desire and give different resource dice. The particulars of the trade are based on the disposition with the faction. Disposition ranges from -6 to +6. The higher the disposition, the better allies they are and the better the trades are going to be. (High disposition also might allow access to military units and powerful artifacts from the faction.)

Aben's Hollow has the following dispositions with minor factions:
  • Gravewood: 2
    • 1 luxury die for 2 timber dice
  • Sunriders: 3
    • 2 mana dice for 3 food dice or
    • 1 mana die for 1 food die
  • Lily Manor: 1
    • 2 food dice for 1 luxury die
The Stronghold may trade with each minor faction only once each season, by placing the number of required dice onto the faction trading chart, and taking the number of dice of the appropriate type. The dice given by the faction are rolled immediately and added to the pool of dice. There is a strategy in trading away the lower valued dice and using the resources the faction gives back to build developments that couldn't otherwise be built.

Aben's Hollow could get a luxury dice from Lily Manor that could be used to build the Trade Relationships development. They'll need a little luck, though, needing to roll a 4 on the dice they get to reach a total of 7. 

Before they do that, though, they could take their mana dice (either 1 or both) and trade them with the Sunriders to get more food dice. That would mean no Mana Forge, though, because they wouldn't have enough mana. But those food dice would give more options when trading with Lily Manor - wheels of commerce spin!
Give two mana dice to get three food dice
Instead of trading 2 mana for 3 food, Aben's Hollow could also trade 1 mana for 1 food. It's not as good of a rate, though, and it doesn't look like the single mana die will be useful for anything.
New food dice are rolled (5,2,1), mana dice are gone

The dice are rolled: 5,2,1. Not great. The 2 and 1 food die are traded to Lily Manor for 1 more luxury die. This is rolled and... 4! Trade Relationships is now possible to get!
Allocated resources for Trade Relationships

All that remains are food dice - 5,5,3,3,2.

The Power of a Luxury Based Economy

One other use for luxuries - they can be spent to re-roll any of one type of resource die. There aren't any left over after this, but this is a powerful use for luxuries. Luxuries are hard to come by!

Feeding the Masses

Finally, an amount of food equal to twice the number of regions must be spent to feed the people.

Aben's Hollow controls 5 regions, so they'll need to allocate 10 food or suffer stability loss. Luckily, they can put the two 5 dice and exactly meet the requirement, with the 3,3,2 food dice left over!

Leftover Resources for Spotlight Fate Points

Two resource dice may be spent to give the spotlight player an additional fate point to start the mission.

Aben's Hollow is left with three dice. Two of those could be used to give the Spotlight Player one additional fate point for this mission. Alternatively, an infantry unit could be mustered for 6 food. The Spotlight Player decides it would be better to muster an additional unit rather than get one fate point.